Changelog
See what's new with Whippy.
Added: Undo Support for Workflow Step Creation and Deletion
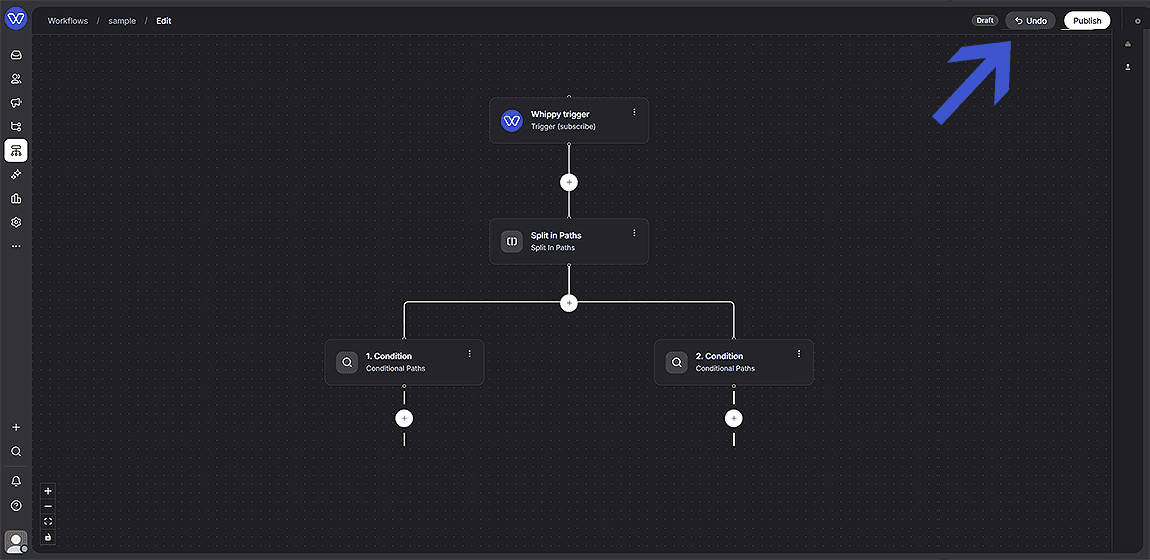
Whippy added Undo support to the Workflow Builder, letting users instantly restore up to 3 consecutive steps or branches after an accidental deletion or creation.
What's Included
- Undo button in the editor header. A new Undo control is available directly in the Workflow Builder header while editing a workflow.
- Coverage for creation and deletion. Undo reverts both the deletion of one or more steps and the creation of new steps, including entire branches within a Split Path.
- Multi-step undo. Undo supports up to 3 consecutive changes, allowing users to revert more than one accidental deletion or creation in a row.
- State restoration. The Workflow Builder preserves previous workflow states, so reverting a change restores deleted steps or removes newly created ones without requiring a manual rebuild.
How It Works
While editing a workflow, step creation or deletion can be reversed with a single click:
- Open a workflow in edit mode.
- Create or delete one or more workflow steps.
- Click Undo in the Workflow Builder header to revert the most recent change. Undo supports up to 3 consecutive clicks, reverting multiple changes in sequence.
- The workflow immediately returns to its previous state, restoring deleted steps or reverting newly created ones.
Why It Matters
Workflow building involves frequent experimentation, and a single deletion inside a Split Path can remove an entire branch of downstream steps. Rebuilding that logic manually costs time and increases the risk of missing a step. Undo removes that risk, even across multiple consecutive changes. Teams can test changes, delete steps, and adjust branches in the Whippy Workflow Builder without worrying about losing work.
Setup
No setup is required. The Undo button is available by default in the Workflow Builder header for all workflows in edit mode.
Added: Copy and Paste for Workflow Branches
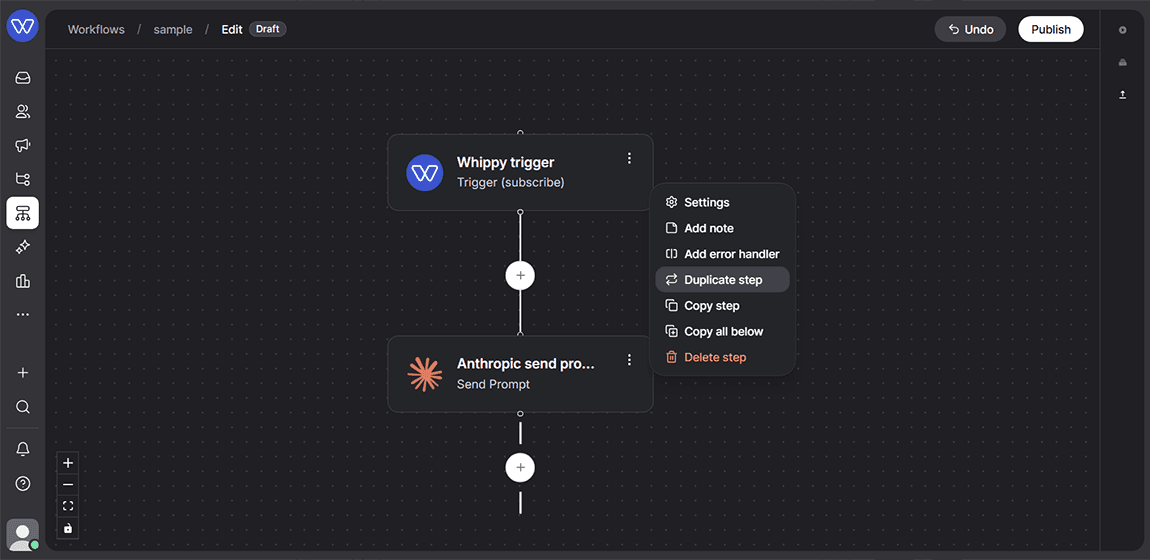
Workflow Builder now lets users copy a full sequence of steps and paste it into another part of the same workflow or into a different workflow entirely.
What's included
- Copy any step and everything below it, including all existing configuration
- Paste the copied branch below another step
- Paste the copied branch in place of an existing step, replacing it
- Paste the copied branch into a different workflow
How it works
- Open a workflow in edit mode.
- Open the menu on the step where the copy should start.
- Select Copy workflow from this point down.
- Go to the destination step, in the same workflow or a different one.
- Choose to paste the branch below the selected step or replace it.
- Whippy adds the copied steps with the same configuration as the original branch.
Why it matters
Workflows with repeated logic used to require manual rebuilding, step by step, field by field. This update removes that repetition. Teams can now duplicate proven workflow branches, reuse them across multiple workflows, and cut down on setup errors that come from manually recreating configuration.
Notes
Pasted steps retain their original configuration. Users can still edit any step after pasting to adjust it for the new context.
Added: Bulk Value Actions for Advanced Multiselect Filters
Whippy added bulk value management for advanced multiselect filters, making it faster to paste, copy, clear, and download filter values in bulk.
What's Included
- Bulk paste: Users can paste multiple values directly from a spreadsheet into supported filter fields
- Copy all: Users can copy all selected filter values in one action
- Clear all: Users can clear all selected filter values at once
- CSV download: Users can download selected filter values as a CSV file
How It Works
These bulk actions appear in the existing condition menu for multivalue filter operators, such as is any of and is none of. Users open the filter condition, select the bulk action they need, and apply it directly, without adding or removing values one at a time.
Why It Matters
Filters with long value lists are slow to build and easy to get wrong when managed manually. Bulk paste, copy, clear, and download actions reduce repetitive work and cut down on setup time for large filter and audience conditions. This is especially useful for teams managing segmentation, list building, or campaign targeting across large contact sets in Whippy.
Setup
No setup is required. Bulk value actions are available now in the condition menu for any advanced multiselect filter that supports is any of or is none of operators.
Notes
Bulk actions apply only to multivalue filter operators. Single-value filter conditions are not affected by this update.
Added: PDF Support for Extract Data & Send Prompt
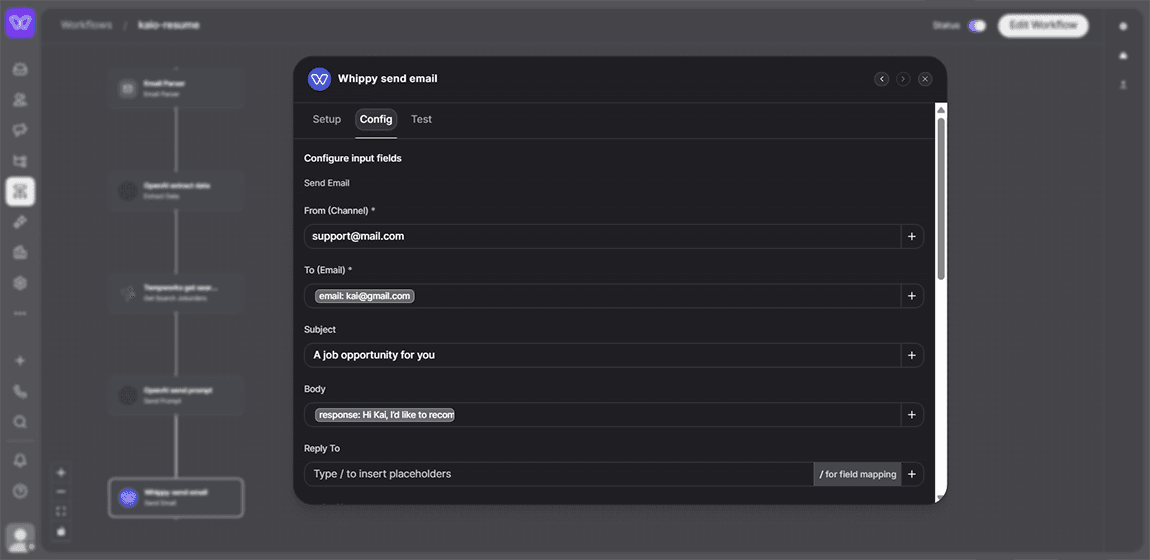
Whippy added PDF support to the Image field on Extract Data and Send Prompt across the OpenAI, Anthropic, and Gemini apps.
What's included
- Added PDF support to the Image field on Extract Data and Send Prompt, in addition to images, on all three LLM apps.
- Added support for PDF URLs, base64, and data URIs, the same input formats already used for images.
- Added automatic file-type detection, so the workflow identifies and processes PDFs without extra configuration.
- Kept full backward compatibility: existing workflows that pass images continue to work exactly as before.
How it works
The Image field on an Extract Data or Send Prompt step accepts a PDF the same way it accepts an image. No separate action, no new field, no extra setup. Whippy detects the file type automatically and sends it to the selected provider (OpenAI, Anthropic, or Gemini) in the format that provider expects. If a file isn't a valid PDF or image, the step returns a clear error instead of a silent failure.
Why it matters
Many of the highest-value document workflows, such as resumes, applications, contracts, invoices, injury reports, and intake forms, start as PDFs, not images. Before this update, customers had to convert or OCR those files outside Whippy before a workflow could use them. That step is no longer necessary: the PDF goes straight into Extract Data or Send Prompt on whichever provider the customer already uses, with the same model picker and placeholder support as any other step in Whippy Workflows. Because the update applies to all three providers at once, customers choose a provider based on their own account and preference, not file-type support. For example, a workflow can now extract candidate data directly from a resume PDF without converting it to an image first.
Setup
No new setup required to use this feature. Make sure the app version is up to date: OpenAI 1.0.5 or higher, Anthropic 1.0.4 or higher, and Gemini 1.0.4 or higher. Once updated, existing Extract Data and Send Prompt steps work with PDFs immediately, using the same Image field and the same connection already configured.
Notes
This change affects the Image field on Extract Data and Send Prompt only. No changes were made to how existing image-based workflows behave.